Monthly Archives: January 2012

Week 4: Thai Basil Turkey Meatballs

I’ve realized that Sundays have started to become my most productive day during the weekend while Saturdays are my lay around, watch tv, maybe work out and then go back to sleep days. Tonight I decided that I really wanted to try something new for dinner and since I was feeling so productive, I decided to try these Thai meatballs that I’ve been eyeing for a while.
I semi-failed at taking pictures while I was cooking since my hands were covered in food the entire time.

The meatballs with rice and stir fry vegetables in my new Gladware containers that I’m in love with.

1/2 cup panko breadcrumbs
2 tablespoons finely chopped green onions
2 tablespoons finely chopped basil
2 teaspoons hot chili sauce
2 teaspoons minced fresh ginger
2 teaspoons minced garlic
1 ½ teaspoons fish sauce
1 lb ground turkey
2 egg whites
2 teaspoons oil, for brushing

1. Pre-heat the oven to 350 degrees
2. Mix all of the ingredients together except for the oil
3. Form one inch balls out of the meat mixture and put them on a lined baking sheet
4. Bake for 15 minutes or until the meatballs are cooked all of the way through. I ended up cooking them for 25 minutes since I made my meatballs a little bit bigger.

The original recipe  has a recipe for sauce that goes with it, but I decided to make my own sauce. I combined french dressing, soy sauce, and a little bit of garlic together and covered the meatballs in that. I also made some stir fry vegetables and rice to go with the meatballs. I’m not sure if I’ll make this again just for myself, but I think I would probably make this for a group of people.

Now if only I could have been this productive with my homework.

Week 3: Breakfast Cookies!

I actually made these a week ago, but with classes starting this week, I’ve been so overwhelmed that I didn’t get a chance to update.

This week, I decided to trying something from Chocolate-Covered Katie. I’m in love with her blog, she has plenty of recipes that are actually healthy!  I decided to try her Oatmeal-Raisin Breakfast Cookies and they were amazing! I actually decided to make two different batches, one with a banana and one with applesauce. There wasn’t much of a difference. The only reason I could tell them apart was because the banana ones had a hint of banana. They were both really good though, though I think I might stick to the applesauce ones since they tasted like the matzoh apple pudding my mom makes for Passover. I also have I have enough rolled oats left over that I think I’m going to make them again this week.

Ingredients

1/2 cup rolled oats
1/2 cup applesauce or over-ripe banana (mashed)
1/4 cup nut butter (I used peanut butter)
1/4 tsp cinnamon
1/2 tsp pure vanilla extract
3 T raisins (I ended up adding more since I’ve been on a raisin kick lately)
1 packet stevia (I also now have a lot of packets of this left over, so I’ll be trying more of Katie’s recipes so I can use them)

1. Pre-heat the oven to 350 degrees
2. Mix together the apple sauce and peanut butter
3. Once the apple sauce and peanut butter are well combine, mix in the rest of the ingredients


4. Form the mixture into balls and lay on a cooking sheet (I made about 12)
5. Bake for 14 minutes and then let them cool.

Just a note, the cookies hold their shape, so you don’t have to worry about them spreading out. Also, mine just turned slightly golden brown, so there wasn’t much of a change in color/appearance. They should be safe to take out after 14 minutes. Once they cooled off, I just threw them into a plastic bag and had one or two for breakfast each morning, they were delicious!

And now back to my mountain of reading. I have three recipes I want to try this week, so hopefully I’ll be able to get to them!


Week 2: Drawer Revamp

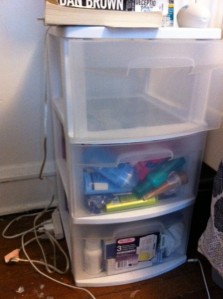
Once upon a time, I had an obsession with organizing everything. I collected multiple plastic bins and stacked them everywhere around my room, filling them up with clutter.

Unfortunately, while these drawers are incredibly useful,

they aren’t as attractive as my organizers drawers from Target:

That’s why this week I decided to do what I’ve been putting off all semester and revamp my plastic drawers. This is incredibly easy, all you need is fun paper (I used some discount wrapping paper from Target), scissors, ruler, a pencil, and double stick tape.

1. Empty out the drawers and measure their sizes.

2. Measure that out on your paper and cut rectangles in the correct sizes.

3. This is where it gets tricky, to line the paper on the sides of the drawers, put the double stick tape on the inside of the drawers, not the paper. I first tried putting the tape on the paper and had problems smoothing it out against the drawer. It’s easier to put tape in the four corners of the drawer, a piece along the top, a piece a long the bottom, and one in the center. Then line up the bottom of the paper (with the fun side facing out) with the bottom of the drawer, center it, and press it against the side of the drawer. I had to try this multiple times to see what actually worked and had the paper line up correctly without a lot of bubbles or wrinkling the paper.

4. Repeat that for each side of the drawer and then repeat for each drawer. I only did 3 sides since the back faces the wall, but you can definitely do all 4 sides.

And you’re done! The drawers look much more attractive now.

Okay, I’ve semi-failed this week

I’ve been sick all week, so I’ve lacked motivation to try a new recipe or craft, but I’m going to try something this weekend!  I have a few simple recipes I want to try, so hopefully it’ll work out.

However, with it finally snowing in Pittsburgh, I’ve developed a new obsession with Duck Boots.

I just got this pair from American Eagle and I’m in love with them.


I also have a nice pair from Sporto that I also love, but I can’t seem to find a picture of them online. I love them because both pairs are waterproof and keep me warm and dry with all this snow. As much as I would love to wear flats and skirts, I can hold off a few more months with these to comfort me.

Week 1: Braided Scarf and S’more Cookie Bars

Okay, so I know it’s technically the beginning of week 2, but I completed my week 1 project yesterday, so it still counts.  Also, to make up for it, I did a new recipe and a new craft project.

To start with the craft:
Braided Scarf
(from Put Up Your Dukes)

I made mine out of two forever 21 shirts, so it was shorter and there wasn’t an extra fabric to loop it around. I also had to hand sew it due to my lack of sewing machine at school and the fact that I had a 6 hour long desk shift and nothing else to do.

Recipe
(from  Baked Perfection)

1/2 cup butter, room temperature
1/4 cup brown sugar
1/2 cup sugar
1 large egg
1 tsp vanilla extract
1 1/3 cups all purpose flour
3/4 cup graham cracker crumbs (approximately 7 full graham crackers)
1 tsp baking powder
1/4 tsp salt
2 super-sized (5 oz.) dark chocolate bars  (I ended up using 2.5)
1 1/2 cups marshmallow creme/fluff (not melted marshmallows and I used all of a 7 oz jar)

1. Preheat oven to 350°F. Grease an 8-inch square baking pan.
2. Cream together butter and sugar until light and then beat in the egg and vanilla.
3. In a separate bowl, whisk together flour, graham cracker crumbs, baking powder and salt.
4. Add your flour/graham cracker mixture to the =butter mixture and mix at a low speed until combined.
5. Divide dough in half and press half of dough into an even layer on the bottom of the prepared pan.
6. Place chocolate bars over dough. If you need to, break the chocolate to create a single layer no more than 1/4 inch thick.
7. Spread marshmallow fluff evenly over the chocolate layer.
8. Place remaining dough in a single layer on top of the fluff, see Baked Perfections instructions on how to do it more easily with a gallon plastic bag.
8. Bake for 30 to 35 minutes, until lightly browned. Don’t forget to let it cool completely before cutting into bars.

I haven’t been able to try it yet since I was too full last night to try it, but I’ll make sure to take a picture when I cut it up!

I also made matzo ball soup last night since I wasn’t feeling that great, but I’ll post that recipe another time (since it wasn’t new and super easy)

Honey Roasted Sweet Potatoes

This is a recipe that I found online when I had a sweet potato that I wanted to use as a side for my dinner, but  I had no idea what to do with it. This recipe is for two sweet potatoes, though in the picture we used 4 and doubled the recipe.

2 Sweet Potatoes
2 tbsp olive oil
2 tbsp honey
1/2 tsp salt
1/2 tsp cinnamon

1. Preheat the oven to 350 degrees F
2. Peel and cut the sweet potatoes into 1 inch pieces and place in a 9×9 dish (or whatever size you feel is adequate)
3. In a separate container, mix together the olive oil, honey, cinnamon and salt. Pour this mixture over the potatoes and stir until all of the potato pieces are adequately coated. I normally like to pour half of the sauce, stir it, and then pour the other half.
4. Bake for one hour. Make sure to stir the potatoes every 15-ish minutes until the potatoes are tender.

As a side note, when I make it for myself, I normally use only one potato and cut the olive oil and honey in half, but use the same amount of salt and cinnamon.

Adapted from Kristine’s Kitchen Blog

I have to be completely honest…

…I’m slightly terrified about making a bog. I’m not really sure why, but oh well, here it goes.

To be even more honest, 2011 was not the best year for me. Luckily, it’s over now and I can move on to better things this year. So for a quick introduction, I’m Dana. I’m currently a first year masters student, working on getting my masters in arts management and hoping to work in fundraising post graduation (thought that’s a year and a half off). That consumes most of my life right now, but I also enjoy reading, dancing, yoga, cooking, and doing craft projects.

I haven’t really planned on making this blog about my life, I mostly want to concentrate on recipes, crafts, and sometimes clothing.  Even though I’m not really a resolutions person, I have decided that this year I want to try either trying a new recipe or new craft each week and post about it. I’m also planning on posting my other favorite recipes and things about clothes/outfits (since my friend Sara insisted).

The name “something good” isn’t a permanent name, I just couldn’t think of anything at moment. However, who knows, it might end up sticking…

Okay, we’ll that’s it for now. I’m currently on break back home, so I might not have anything new until I head back to school later this week, but I have a few older recipes that I’ll try to post!

-Dana